
Brake Adjustment

While bicycle brakes offer excellent stopping power, over time the cables may stretch, the brake pads wear and a pad might drag on the rim. Because your safety depends on optimum braking, we’ve prepared these guidelines for common adjustments to ensure that your grippers are always at their best.

Please note that these instructions are for conventional brakes, not disc brakes. If you need adjustment for your disc brakes, bring them to us. Also, because brakes are so important for safety, we do not recommend working on your conventional brakes unless you’re confident in your ability to do the job right. And, keep in mind that in order for brakes to work properly and to make the adjustments explained in this article, the wheels must be true and round (no side-to-side wobbles, up-and-down hops or bends).

If you have any questions about brake adjustment please give us a call or bring your bike in for service and we’ll be happy to help.

Tightening the Brakes
For off-road, comfort, hybrid and city bikes with upright handlebars; look at the brake levers for a Turn the barrels to tighten the brakes
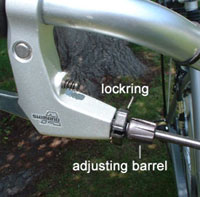
handy device called an adjusting barrel (photo).

It will have a knurled edge for easy gripping and it makes adjusting your brakes easy without tools.

It’s perfect for making your brakes feel like new after you’ve logged a good many miles and worn down your pads. And you can even use it on rides if your brakes begin to feel weak as sometimes happens when it's muddy or wet.

To use adjusting barrels, turn them counterclockwise by hand and check the setting by squeezing the levers. When the brakes feel right, lock the barrel adjusters in position by turning the lockring (the second knurled piece) clockwise until it's tight against the lever.

On road bikes with dropped handlebars, you’ll find the adjusters on the brakes (photo). To tighten For sidepulls, the adjuster is on the brake
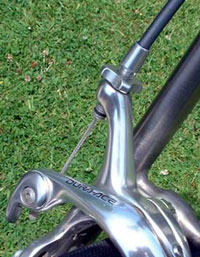
the brakes, turn the adjusters in the direction that moves the pads closer to the rims.

Keep in mind that when your brake pads wear out, the adjusters won’t do any good and you’ll need to turn the adjusters all the way back and replace your brake pads.

Wheel Centering
One of the most common brake problems is a dragging brake pad; one that remains against the rim or stays close to it after you’ve released the brake lever. 

The most common cause of this problem is a misaligned wheel. This can occur when you reinstall your wheel after removing it to put your bike on a roof rack or to fix a flat tire, and you don’t get it exactly centered in the frame.

This causes the brake to work improperly because it’s tight on the frame and has been adjusted to align properly only on a perfectly centered wheel. Now that the wheel is crooked in the frame, the brake can't work correctly.

To correct the dragging shoe, simply center the wheel in the fork or frame. For most wheels, all that’s usually required is loosening, making sure they’re fully inserted in the fork or frame, and tightening them. (If the bike is standing, just press down on the handlebars for the front wheel and the seat for the rear wheel to push them fully into the frame and center them.)

If you have a frame that lets you place the rear wheel in different positions, check that the wheel is Use your fingers/thumbs to judge centering (brake removed for clarity)
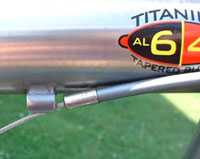
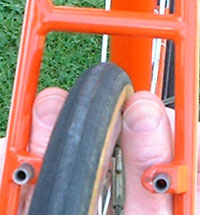
centered between the seatstays and chainstays before tightening it. You can do this by looking at it or use your fingers as “feeler gauges” by sliding the same finger on each hand between the frame and rim or tire feeling if it’s centered (photo; the brake was removed so you can see the details).

Brake Centering
If your wheels are centered and the brake still drags, the brake may have gotten bumped and knocked out of position on the frame. Start by double-checking that the wheel is centered in the frame because you don’t want to ruin the brake adjustment if it’s actually set correctly.

To center sidepull brakes (road bikes), loosen the attaching bolt behind the fork crown or brake bridge until the brake is loose. (It shouldTurn to fine-tune centering 
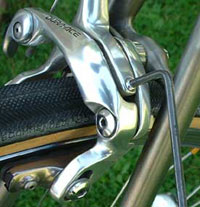
move sideways when you push it).

Now, squeeze the lever to hold the brake pads against the rim while you tighten the brake bolt on the back of the frame. If the brake needs minor fine-tuning after this, look for a small screw (it might be an Allen type) on top of the brake. Clockwise turns (photo) will move the brake shoe on the side of the screw away from the rim and vice versa. (This screw is not intended for major adjustments.)

If adjusting the screw doesn't center the brake, screw it back to where it was and double-check how well centered the wheel is because that's probably the problem.  

To center linear-pull brakes (off-road and hybrid bikes), look for a small screw in the side of the brake arm. Clockwise Turn the screw to center the brake
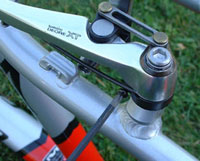
turns of this screw (photo right) will move the pad in the arm with the screw away from the rim and vice versa.
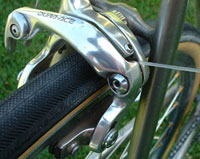
Brake Binding
Brakes should operate smoothly and easily and the brake pads should snap away from the rims when you release the levers. If not, the brake pivots or cables might be dry, causing binding.  To free the pivots, lightly lubricate the brakes where the arms pivot (photo below) and squeeze the levers repeatedly to work the lube into the brakes. (Be sure NOT to get any lube on the brake pads or rim. If some gets on them; wipe them clean with A little lube keeps brakes from bindingrubbing alcohol.)

Better? If not, it might be the cable that needs lube. Usually, this is only required on rear cables with split housing (if you have split housing you can see the middle of the inner cable and the housing is in two pieces).

Look closely at where the housing sections enter the stops on the frame. If the stops are split, you’ll be able to remove the housing and lubricate most of the cable. If the housing stops aren't split, raise the bike so that gravity will draw the lube into the housing section, apply a few drops of lube on the cable and squeeze the rear brake lever to draw the lube into the housing. Repeat for the front section of housing.Release the cable to lube it

If the housing stops are split, open the quick release on sidepull brakes or unhook the noodle on linear-pulls. This should provide enough slack so that you can pull gently on the housing sections and free them from the frame stops (photo). If you need more slack, squeeze the brake shut with your hand.

When the housing is released from the stop, slide the rear housing section (with flat-handlebar-equipped bikes you’ll be able to slide the front housing section, too) along the cable so that you can lubricate the cable where it runs inside the housing, which should eliminate the binding. Then reconnect the cables and your brakes should feel as good as new.

If you have any questions or would like our professional technicians to service your brakes, just give us a call or bring your bike into the shop and we'll be happy to help.